Even More Text-to-Image Choices for ComfyUI with 8GB VRAM
In our previous beginner's guide to ComfyUI, we broke down how to run a modern text-to-image model in ComfyUI with only 8GB of VRAM. Today, we are expanding your horizon. We will cover the best additional local options that comfortably run on 8GB VRAM.
In this follow-up, we will look at:
- Why look for more local image generators
- Which local text-to-image models can run on an 8GB GPU
- The strengths, the trade-offs and the practical use cases of local generation
Why Look for More Local 8GB VRAM Image Generators?
In our previous findings, we discovered that running AI models locally is often hard to justify on cost alone. After accounting for the graphics card, computer hardware, electricity, storage and maintenance, local inference may take a long time to break even compared with using a cloud service.
However, that conclusion mainly applies to text and chat models.
Cloud-based text services generally provide much larger free or low-cost usage allowances. A chat response also requires far less computing power than generating an image. For most casual users, services such as Gemini and Copilot can handle everyday writing, summarisation, brainstorming and question-answering without quickly exhausting their available quota.
Image generation is a different story.
Cloud providers have realized that rendering millions of high-resolution images is financially unsustainable, leading to heavy restrictions:
- Google Nano Banana 2 - Free users are generally capped at around 20 images per day. Some users report even tighter effective limits.
- Microsoft Copilot - Free accounts usually get roughly 15 generations per day.
For casual use it may be fine. For serious creators or anyone who wants consistency and volume, it quickly becomes frustrating. While moving your text-to-image workflow to local ComfyUI means unlimited generations, zero monthly fees, complete privacy, and total creative independence.
Top Local Text-to-Image Choices for 8GB VRAM
In our previous post, we discussed how a large modern image-generation model, FLUX 1.dev, can run on a consumer graphics card with only 8GB of VRAM using quantization on ComfyUI. If you are ready to expand your horizon beyond FLUX 1.dev(we are sure you do!), here are the best free, local image generation models you should run in your ComfyUI workflow today:
- Z-image - Developed by Alibaba Tongyi Lab, Z-Image is a 6-Billion parameter foundation model that rewrites the 3 pillars (UNet, CLIP and VAE) we discussed in our previous post. Built on a Single-Stream Diffusion Transformer (S3-DiT), it blends text tokens and image latent patches into a single, unified sequence right from the start. This drastically reduces mathematical overhead and making it lightweight in VRAM consumption. Most importantly, this early-fusion design allows the model to cleanly subtract negative concepts during generation, precisely removing artifacts or text clutter without warping the surrounding lighting, color, or composition. Quantizated models can be found here.
- Qwen-Image – Developed by Alibaba’s Qwen Team. Qwen-Image is a massive, heavyweight 20-Billion parameter framework that utilizes a Multimodal Diffusion Transformer (MMDiT) structure. This powerhouse is uniquely optimized to handle dense prompt instructions up to 1,000 tokens, enabling it to render advanced multi-line typography, complex posters, and infographics without structural breakage. It natively supports ultra-high resolution generation and bypasses the need for independent upscalers to paint deep micro-textures, like fabric weaves, from the base level. Quantized models can be found here.
- HiDream-I1 - Developed by the HiDream.ai Team, HiDream-I1 is a massive 17-Billion parameter foundation model built on a Pixel-level Unified Transformer (UiT). This architectural design, combined with a built-in "thinking" layer, gives the model an invisible project planner. Before it paints a single pixel, it reads your prompt, figures out the logical blueprint of your request, and maps out exactly where everything belongs. This prevents objects from drifting around randomly, making it the absolute best tool for hyper-precise layouts like software interface templates and commercial product placements. Quantized models can be found here.
The Local Image Arena: Putting the 8GB VRAM Models to the Test
To see how these architectural differences translate into real pixels, let’s run a side-by-side comparison using the exact same prompt and core settings across the mentioned 3 Text-to-Image models. All the related ComfyUI workflow can be downloaded from here.
The Settings:
- Resolution: 512× 512
- Steps: 30
- Classifier-Free Guidance (CFG) Scale: 5
- Seed: 20260731
- Sampler/Scheduler: Euler / Normal
Test #1: The Positive Test Prompt:
A watercolor-style illustration of a sad Keanu Reeves sitting on a wooden park bench, holding a half-eaten taco up to his mouth. On the bench next to him is a discarded paper bag with the legible text 'TACO TIME' written on it. Soft brush strokes, pigment pooling on textured paper, muted colors.
Test #1: The Negative Test Prompt:
photorealistic, camera lens flare, modern digital painting, bright neon colors, extra fingers, text clutter, plastic texture
Test #1: The Results:
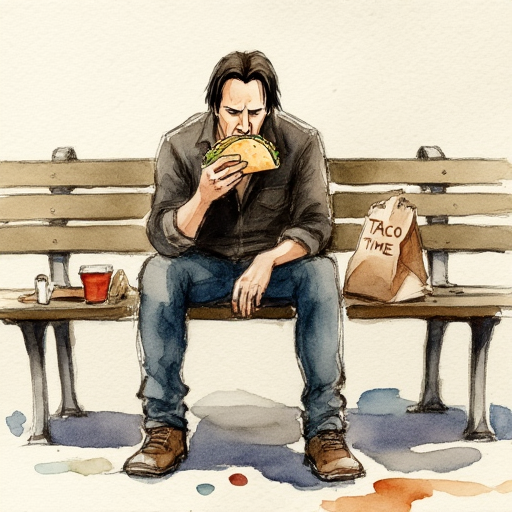
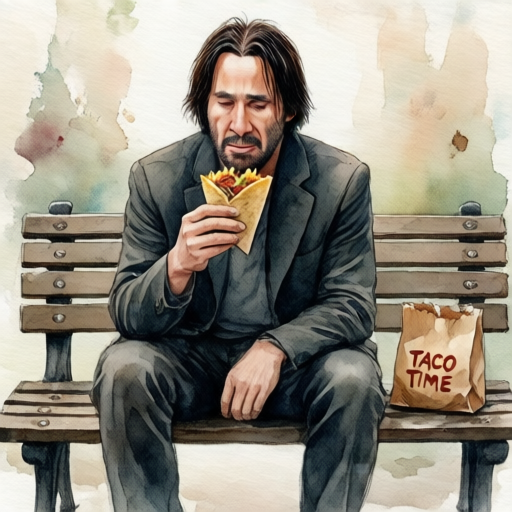
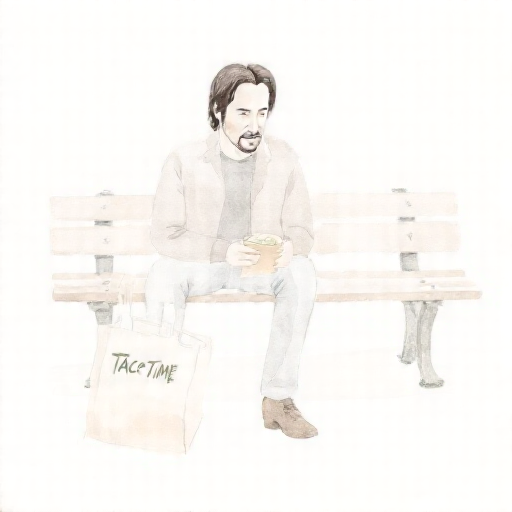
Z-Image (128.41s), Qwen-Image (339.25s), HiDream-I1 (1062.33s)
All models can reflect our prompt instructions, just the definition of "watercolor" from HiDream-I1 is out of my expectation. Among the successful generations, Qwen-Image stood out by a wide margin, rendering noticeably sharper details across the entire canvas.
Test #2: The Positive Test Prompt:
A clean cartoon-style illustration of a friendly grizzly bear sitting on an office chair at a wooden desk, focused on using a computer. The bear has highly expressive eyes, a warm smile, and its paws are actively typing on a glowing keyboard. On the computer screen, the text 'WORK HARD' is clearly legible in a bold font. Simple office background, clean vector lines, soft digital cell shading, and consistent, soft corporate lighting.
Test #2: The Negative Test Prompt:
photorealistic, 3D render, low quality, sketch, messy lines, text clutter, extra limbs, distorted keyboard, dark moody shadows, watermarks, signatures.
Test #2: The Results:
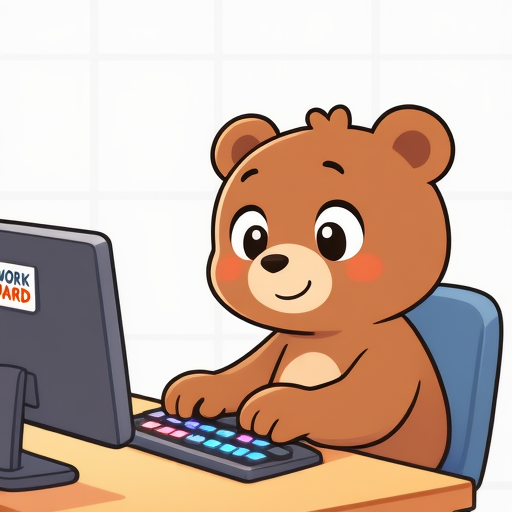

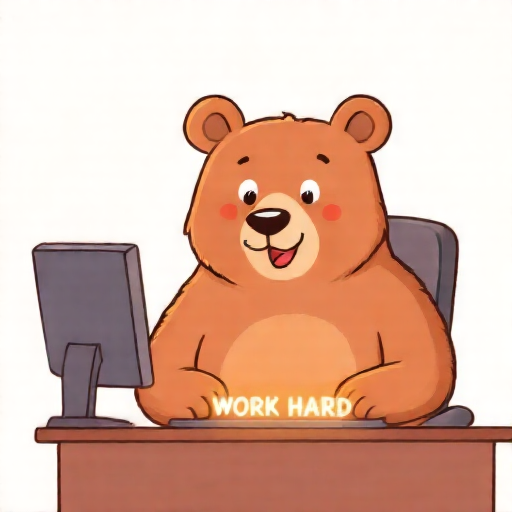
Z-Image (717.80s), Qwen-Image (777.65s), HiDream-I1 (285.46s)
In this test, the graphics look simpler, but the prompt is actually more descriptive. When it came to handling the complex combination of typography and background elements, Qwen-Image was the only contender capable of fully rendering the text prompt. Meanwhile, Z-Image was the runner-up, closely following our composition and and lighting instructions.
Test #3: The Positive Test Prompt:
A photorealistic side-profile, half-body portrait of a woman standing on a busy city street in winter. She is wearing a thick, textured wool knit coat and a detailed red scarf, with visible fabric weave and tiny water droplets from melting snow on her shoulders. Her face shows natural skin textures, fine pores, and clear details as soft breath mist escapes her lips. In the background, a blurred city street features moving traffic, pedestrians, and a neon shop sign that clearly reads 'OPEN' in a soft glow. Crisp natural winter daylight, cinematic depth of field.
Test #3: The Negative Test Prompt:
cartoon, 3D render, illustration, smooth plastic skin, airbrushed, extra fingers, text clutter, bad anatomy, heavy grain, flash photography, double exposure, watermark, signature.
Test #3: The Results:
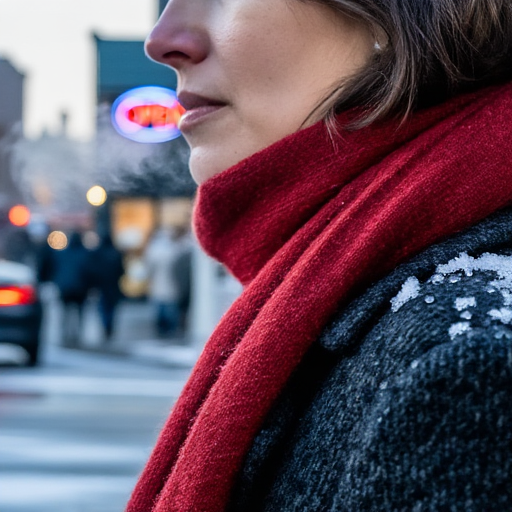
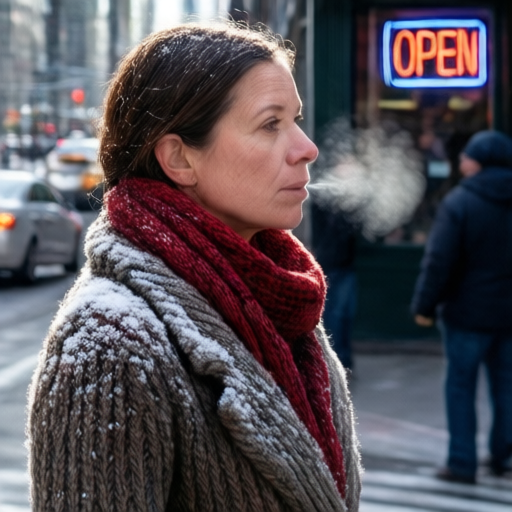
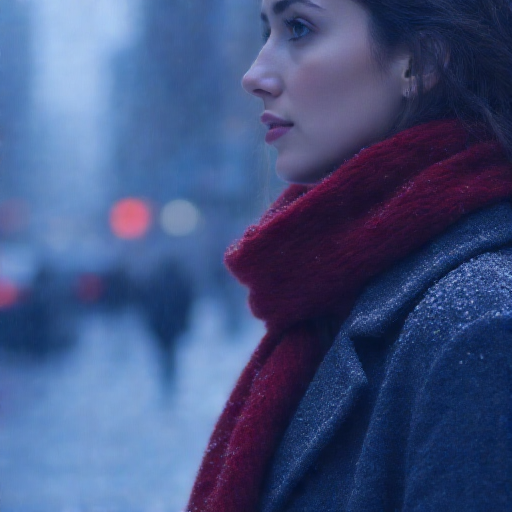
Z-Image (157.09s), Qwen-Image (310.30s), HiDream-I1 (1581.01s)
Once again, Qwen-Image proved its architectural dominance by being the only model to fully satisfy every element of our prompt, including the textual backdrop. While Z-Image and HiDream-I1 did a good job of putting the complex scene together, they ultimately fell short of capturing the complete picture.
Overall, Qwen-Image becomes the clear winner of our testing arena, delivering the highest-quality visuals, deepest micro-textures, and the most reliable text-rendering capabilities of the group. Following closely behind is Z-Image, which secures a strong second place, while its details aren't quite as sharp as Qwen's, its efficient S3-DiT architecture makes it the fastest model to render among the three.
The Need for Speed: Intrdoucing the Distilled Models
While running a 30-step generation on an 8GB VRAM card is completely doable with quantized GGUF files, it can still take 10 minutes+ per image depending on your exact GPU model and computer's configuration. If you want to rapidly iterate, you need a distilled model.
What is a Distilled Model in Image Generation?
In image generation, "distillation" is a technique where a massive, slow foundation model (the teacher) trains a smaller, specialized network (the student) to mimic its outputs in a fraction of the time.
Think of a foundation model like a traditional painter who precisely crafts an artwork layer by layer over 30 steps. A distilled model takes the "knowledge" of those 30 steps and compresses it. Instead of 30 steps, a distilled model can output a high-quality image in just 4 to 8 steps, cutting your wait time down by up to 80%.
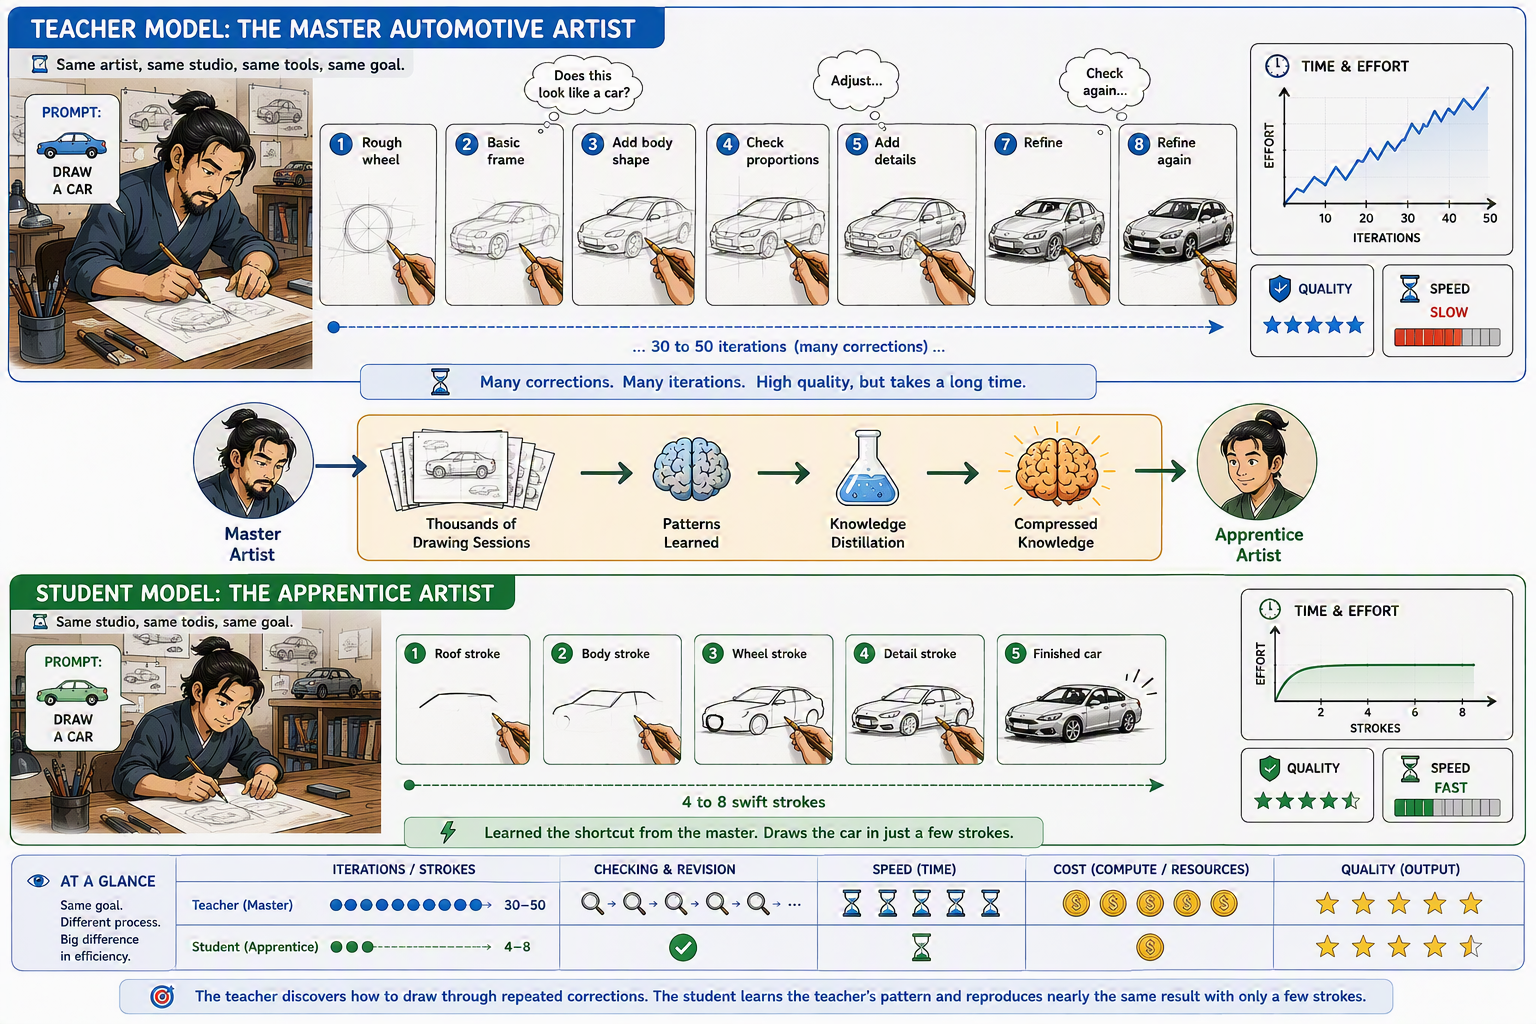
Each of our three foundation models has a popular distilled speed-demon counterpart, and we also bring out the distilled model from our favorite FLUX model:
- Z-Image-Turbo from Z-Image
- Qwen-Image-Lightning from Qwen-Image
- HiDream-I1 Fast from HiDream-I1
- FLUX.2 [Klein] from FLUX.2
The High-Speed Arena: Putting Distilled Models to the Test
Let’s run the exact same prompt from earlier, but this time we will switch our workflow over to the distilled versions to see how they handle the pressure under high-speed settings. Again, all the related ComfyUI workflows can be found here.
We use the same testing setting and prompts to run the hish-speed arena. All distilled models have been set to iterate 8 steps, except HiDream-I1-Fast, which the model needs 15 steps to generate. Although we have negative prompts inside the workflow, distilled models actually just ignore the prompts.
Test #1 results:
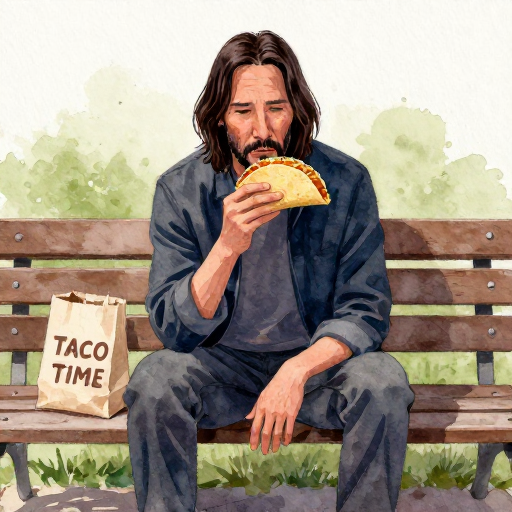
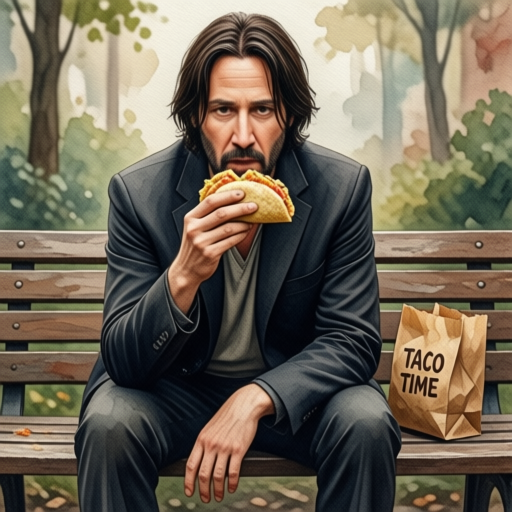
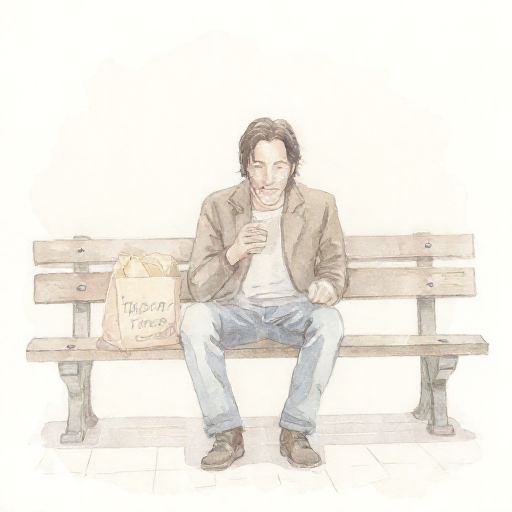
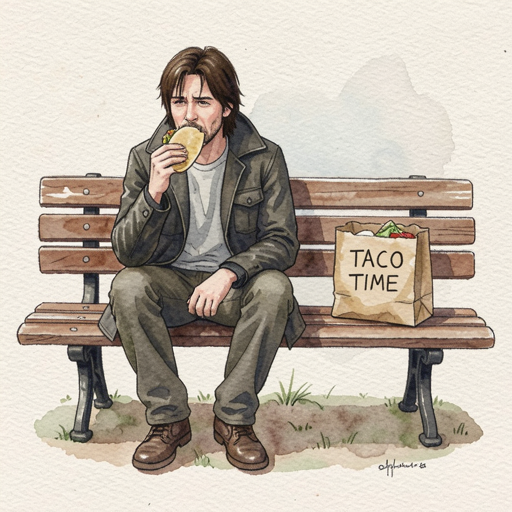
Z-Image-Turbo (78.39s), Qwen-Image-Lightning (83.36s), HiDream-I1-Fast (247.71s), FLUX.2 [Klein] (29.18s)
Qwen-Image-Lightning, much like its foundation model, outperformed the other contenders by producing an image with rich details. Z-Image-Turbo was a solid runner-up, closely following Qwen-Image-Lightning. HiDream-I1-Fast struggled in this round, could not generate the taco in hand and the text on the paper bag. Making its first appearance in the arena, FLUX.2 [Klein] delivered a good result, and most importantly, it recorded the fastest generation time among the four models.
Test #2 results:




Z-Image-Turbo (36.94s), Qwen-Image-Lightning (320.17s), HiDream-I1-Fast (138.51s), FLUX.2 [Klein] (19.38s)
The results were similar to those of the foundation models. Qwen-Image-Lightning successfully followed all the prompt instructions. Surprisingly, FLUX.2 [Klein] also handled the instructions well. Z-Image-Turbo, however, produced an overly simplified result and missed some of the requested details.
Test #3 results:
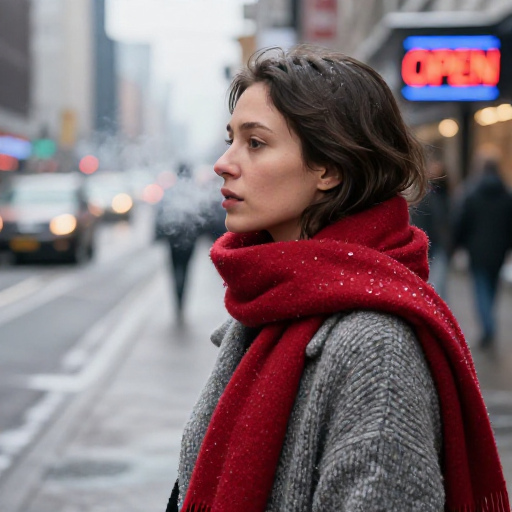
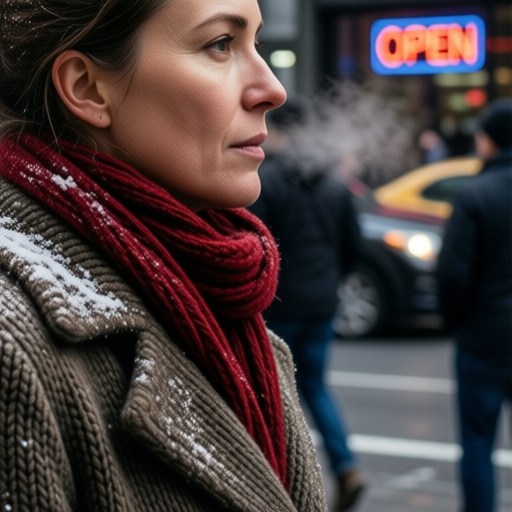
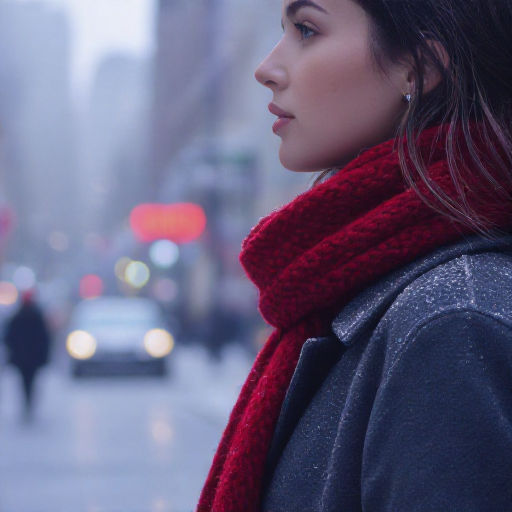
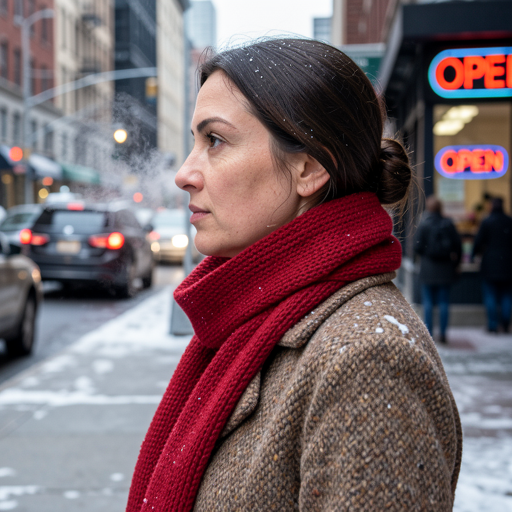
Z-Image-Turbo (17.63s), Qwen-Image-Lightning (120.82s), HiDream-I1-Fast (582.56s), FLUX.2 [Klein] (142.65s)
In this round, Z-Image-Turbo surpassed its foundation model by successfully including all the requested elements. Qwen-Image-Lightning and HiDream-I1-Fast performed similarly to their foundation-model versions: Qwen-Image-Lightning followed the prompt well, while HiDream-I1-Fast struggled to capture all the instructions. FLUX.2 [Klein] also performed well and followed the prompt closely.
Overall, Qwen-Image-Lightning just outperforms the others in term of prompts following and image quality. While FLUX.2 [Klein] can follow the prompts well, and the processing time is the fastest among other models. I will rank Qwen-Image-Lightning > FLUX.2 [Klein] > Z-Image-Turbo > HiDream-I1-Fast.
Overall, Qwen-Image-Lightning delivered the best combination of prompt adherence and image quality. FLUX.2 [Klein] also followed the prompts well and achieved the fastest generation time among the four models, making it an excellent choice when speed is the priority.
I will rank Qwen-Image-Lightning > FLUX.2 [Klein] > Z-Image-Turbo > HiDream-I1-Fast for the overall performance.
The Blueprint: Strengths, Trade-Offs, and Practical Use Cases of Local Generation
Unlocking advanced Text-to-Image choices on an 8GB VRAM card isn't about finding a single "perfect" model, it is about understanding how to navigate specific architectural trade-offs based on the practical needs of your project.
The Strengths: Total Customization vs. Instant High-Quality
- Foundation Models: The core strength of true foundation models lies in their deep customizability. Because they utilize full 30 to 50 sampling steps, they can generate images with incredibly rich micro-details, like the texture of clothes, characters' skin features, and precise background elements. Most importantly, they offer superior CFG and native negative prompt control, giving you total command over what is added or subtracted from your canvas.
- Distilled Models: The ultimate strength of distilled models is their ability to produce high-quality images with lightning-fast processing speeds. By compressing the generation process into just 4 to 8 steps, they drop your wait times on an 8GB VRAM card largely. This gives you quick results on your screen while still keeping your pictures crisp and clean.
The Trade-Offs: Processing Time vs. Loss of Uniqueness
- The Foundation Models: The price you pay for ultimate customization is higher resource consumption and extended processing time. Running heavy, quantized GGUF matrices through dozens of sampling steps means each generation can take up to 10 minutes on mid-tier hardware, slowing down rapid experimentation.
- The Distilled Models: Because distilled models rely on pre-memorized architectural shortcuts, their outputs can feel like "canned" or over-educated graphics. They often generate aesthetics that look very common or similar to other mainstream AI images, causing them to lose their visual uniqueness. Furthermore, because their internal settings are baked in, they are hard to further modify, micro-tweak, or fine-tune using negative prompts.
The Practical Workflow: From Concept to Masterpiece
We suggest using this two-phase strategy to get the best out of both the distilled and foundation models:
- Phase 1 with Distilled Models: Use a distilled model during the brainstorming stage. This allows you to rapidly cycle through dozens of ideas, test composition layouts, and define your core visual concepts in real-time.
- Phase 2 with Foundation Models: Once your core concept, composition, and theme are locked in, swap the node over to a foundation model. Run the full sampler setup to paint the final image and with with rich micro-textures, precise negative prompt corrections, and a truly unique artistic identity.
The Final Render
The open-source AI landscape is evolving at a breakneck pace, and by using the local image models, you no longer have to feel trapped by restrictive cloud quotas, watermarks, or corporate filters. Whether you choose to dive deep into the high detail and high customizable foundation models or sprint ahead with the quick feedback of distilled models, you are expanding the entire universe of what your local machine can achieve. Don't be afraid to experiment, the best way to learn ComfyUI is through hands-on discovery, so plug in these new models, queue your prompts, and see what incredible worlds you can create locally today!