Cloud vs Local LLM: The Real Tradeoffs — and How to Run Your Own AI in Minutes


Say goodbye to API keys, token bills, and data leaks.
Let's discover how to create a fully local LLM(Large Language Model) chatbot using Ollama and a modern Python setup in 10 minutes. Whether you are a developer, privacy advocate, or AI enthusiast, this guide will walk you from environment setup to model selection, benchmarking, and cost comparison.
The practical starting guide
Before we start anything, we need a working local LLM stack. At minimum, we need:
- Hardware: Enough memory and compute for the chosen model size. On traditional PCs, that usually means at least 16 GB RAM and a GPU with 8 GB or more of dedicated VRAM for running a typical 7B model. On Apple Silicon M-series Macs, the system uses Unified Memory, so the CPU and GPU share the same pool instead of having separate GPU VRAM. In practice, 16 GB Unified Memory is a good baseline for a 7B model.
- Ollama installed: Ollama is a lightweight local LLM runtime that lets us download and run open models on your own computer. It provides a local API, so our Python app can chat with models without relying on external cloud services. Download from the official site and install for macOS, Windows, or Linux.
- Uv installed: uv is a fast, modern Python package and project manager used to create virtual environments, install dependencies, and run the application. In this project, uv replaces older manual workflows such as pip we mentioned in 2017 and pipenv in 2018, making deployment cleaner and easier.
Select a model
Choosing the model is the most important practical decision.
A model name such as qwen3.5:9b tells you two things:
qwen3.5is the model family9bmeans roughly 9 billion parameters
In LLM names, B means billion parameters. Parameters are the learned numerical weights inside the model. In general, more parameters can mean better reasoning, knowledge, and coherence, but they require more memory and compute.
How much VRAM do you need?
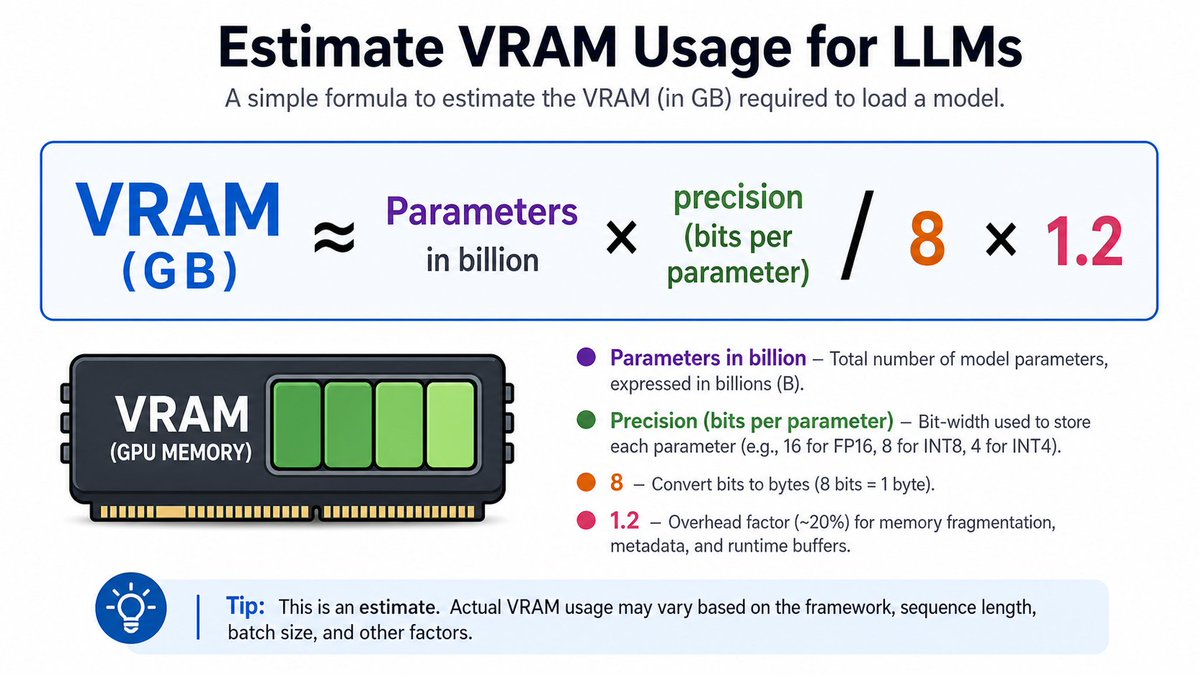
A good rule of thumb for VRAM (or unified memory) required to load a model is:
VRAM (GB) ≈ Parameters in billion × precision (bits per parameter)/8 × 1.2
- Precision: Most local models are "quantized" (compressed) to 4 bits per parameter to save space without losing much intelligence. Uncompressed models usually run at 16 bits.
- The 1.2 Multiplier: This adds a 20% overhead buffer for runtime memory, buffers, and inference management.
Examples:
| Model size | Precision | Estimated memory |
|---|---|---|
| 7B | 4-bit | 7 × 4 / 8 × 1.2 ≈ 4.2 GB |
| 13B | 8-bit | 13 × 8 / 8 × 1.2 ≈ 15.6 GB |
How to choose the model?
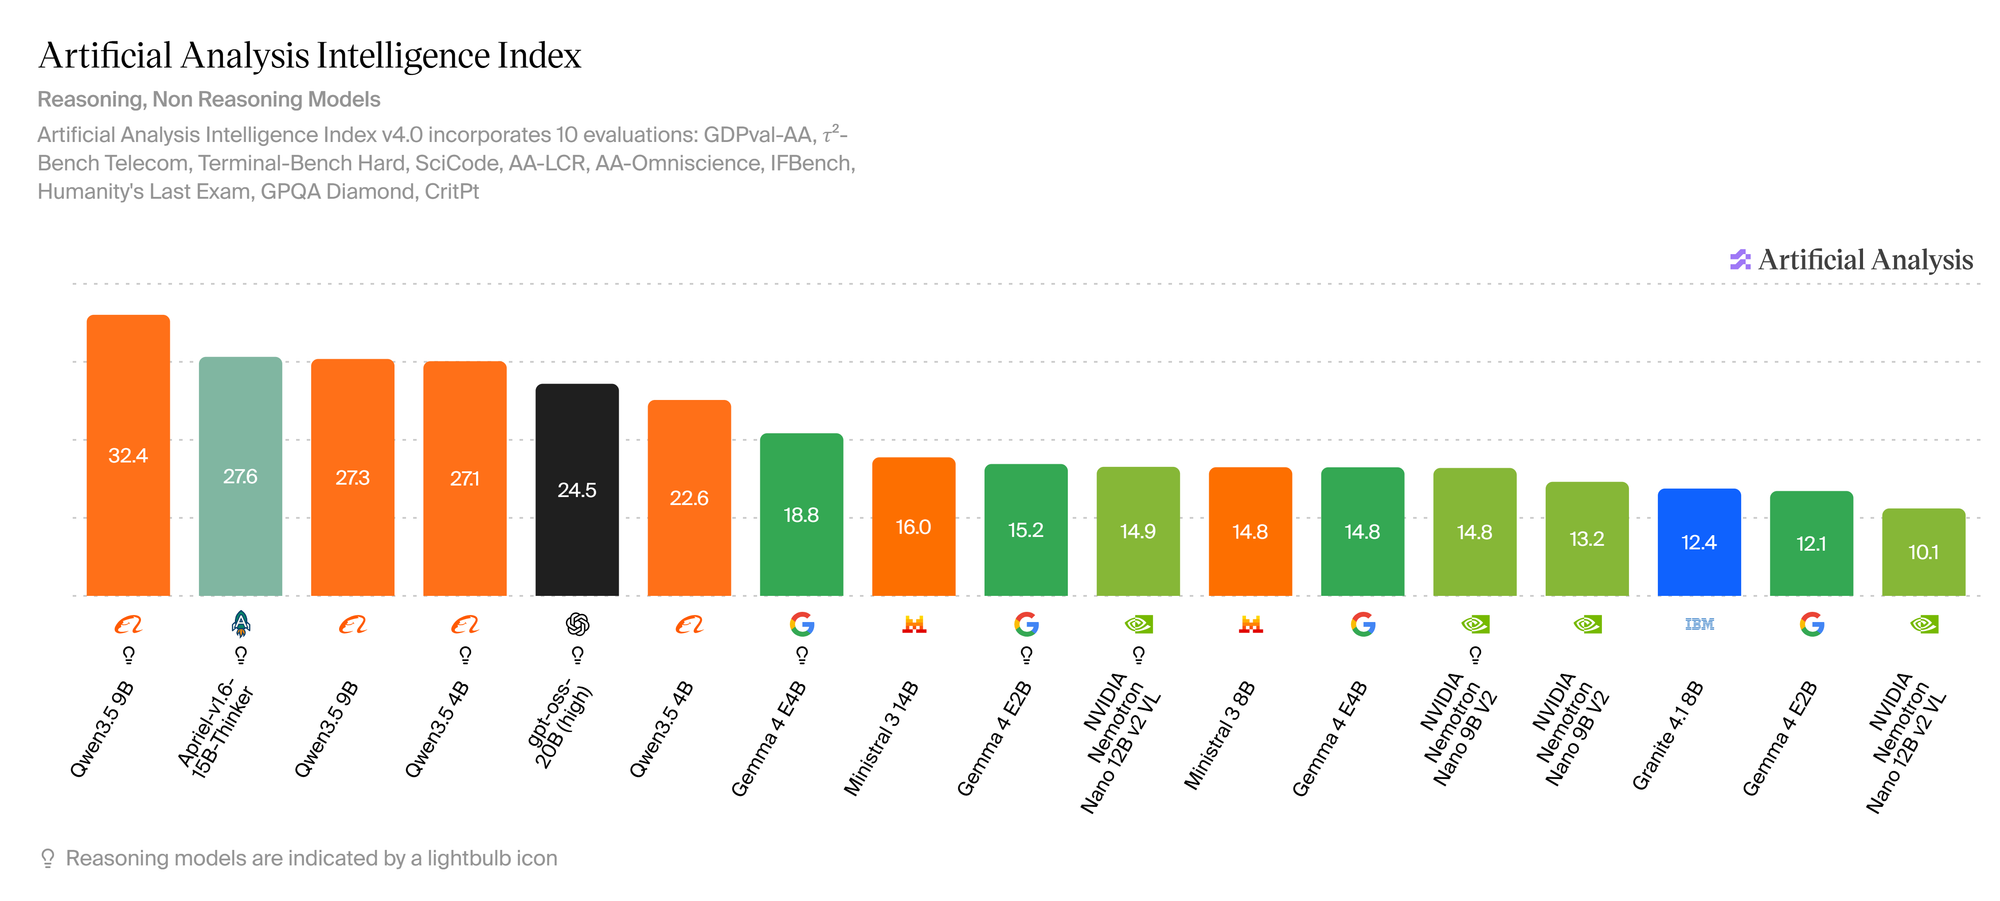
Use Artificial Analysis to shortlist models. It ranks open models by quality index, speed, and efficiency. In 2026, the Qwen3.5 family consistently scores the top for its size, which makes it an excellent candidate for local deployments.
Now go to the official Ollama models library and search your favorite model. In our case, we select Qwen3.5. Go to the library page and copy the exact model name there(e.g. qwen3.5:9b, qwen3.5:4b or qwen3.5:0.8b).
Run the following command on your terminal:
ollama pull <model-name>Ollama will download and cache the model so it’s ready for your chatbot client.
Writing the LLM client
Ollama server ✅
Local model ✅
Uv development environment ✅
What time is it now?
It's clobbering coding time!
Open a terminal and input:
uv init <project name>
cd <project name>
uv add ollama python-dotenv
Uv boostraps a Python virtual environment for us, it provides a empty main.py and a pyproject.toml files. The pyproject.toml file is the modern standard configuration file for Python projects. Let's forget the legacy plain text requirements.txt.
Create a .env file if you want to override defaults later:
OLLAMA_HOST=http://127.0.0.1:11434
OLLAMA_MODEL=qwen3.5:9b
OLLAMA_KEEP_ALIVE=24h
The complete source with Docker deployment file can be found at https://github.com/codeastar/local_llm_playground. In here, we would like to highlight the important parts.
Open the empty main.py and start adding:
from ollama import chat
from dotenv import load_dotenv
import argparse
import os
import threading
import time
from urllib.error import URLError
from urllib.request import urlopen

load_dotenv()
This section loads the tools and the environment variables our chatbot needs.
SYSTEM_PROMPT = (
    "You are a helpful, concise chatbot. "
    "Answer clearly and ask follow-up questions when useful."
)
This is how we define our local chatbot's personality. You can customize this prompt depending on your use case. For example, you could make the chatbot act as a coding assistant, teaching assistant, or even The Joker in Gotham City :]].
def get_ollama_base_url():
    host = os.getenv("OLLAMA_HOST")
    if host:
        return host.rstrip("/")
    port = os.getenv("OLLAMA_PORT", "11434")
    host = f"http://127.0.0.1:{port}"
    return host.rstrip("/")

def is_ollama_running(timeout=1.5):
    tags_url = f"{get_ollama_base_url()}/api/tags"
    try:
        with urlopen(tags_url, timeout=timeout) as response:
            return response.status == 200
    except URLError:
        return False
These helpers make sure we’re talking to the right server, and that it’s actually running.
def show_thinking_timer(stop_event):
    start = time.perf_counter()
    while not stop_event.is_set():
        elapsed = time.perf_counter() - start
        print(f"\rBot is thinking... {elapsed:0.1f}s", end="", flush=True)
        stop_event.wait(0.1)
This runs in a background thread, updating “Bot is thinking… X.Xs” every 0.1 seconds. It makes the chatbot feel more alive and gives feedback when a model takes a few seconds to respond.
def run_chatbot(model_name):
    keep_alive = os.getenv("OLLAMA_KEEP_ALIVE", "24h")

    messages = [
        {"role": "system", "content": SYSTEM_PROMPT}
    ]

    print(f"Local LLM Chatbot [model={model_name}]")
    print("Type 'exit' to quit.\n")

    while True:
        user_input = input("You: ").strip()
        if user_input.lower() in {"exit", "quit"}:
            print("Goodbye!")
            break

        messages.append({"role": "user", "content": user_input})

        # start thinking timer
        stop_event = threading.Event()
        timer_thread = threading.Thread(
            target=show_thinking_timer,
            args=(stop_event,),
            daemon=True,
        )
        timer_thread.start()
        thinking_start = time.perf_counter()
        thinking_time = None

        assistant_text = ""
        started_output = False

        stream = chat(
            model=model_name,
            messages=messages,
            stream=True,
            keep_alive=keep_alive,
        )

        for chunk in stream:
            piece = chunk.get("message", {}).get("content", "")
            if piece and not started_output:
                thinking_time = time.perf_counter() - thinking_start
                stop_event.set()
                timer_thread.join()
                print("\r" + " " * 40 + "\rBot: ", end="", flush=True)
                started_output = True
            if piece:
                assistant_text += piece
                print(piece, end="", flush=True)

        if not started_output:
            thinking_time = time.perf_counter() - thinking_start
            stop_event.set()
            timer_thread.join()
            print("\r" + " " * 40 + "\rBot: ", end="", flush=True)

        print(f"\nThinking time: {thinking_time:0.2f}s\n")
        messages.append({"role": "assistant", "content": assistant_text})
This is where the magic happens: it keeps a running list of messages (starting with the SYSTEM_PROMPT), then repeatedly reads user input, appends it as a "user" message, and calls ollama.chat with stream=True so the model’s reply arrives chunk by chunk rather than all at once. As soon as the first piece of text comes back, the code stops the show_thinking_timer, streams each token to the terminal, gradually building up assistant_text. When the response finishes, it logs how many seconds the model spent “thinking” and appends the full assistant message back into messages, so the next question is answered with full conversation context instead of a stateless one‑shot reply.
The whole main.py is a practical local chatbot that contains error handling, environment variable support, model selection, streaming output, and response timing. To run it, just type:
uv run main.pyOr
uv run main.py <model_name>
e.g. uv run main.py qwen3.5:0.8b
If the above code is still too long for you, here is a local chatbot that includes only the essential logic in under 50 lines of code:
from ollama import chat

model_name = "qwen3.5:4b"
messages = [
    {
        "role": "system",
        "content": "You are a helpful, concise chatbot."
    }
]

print(f"Local LLM Chatbot [model={model_name}]")
print("Type 'exit' to quit.\n")

while True:
    user_input = input("You: ").strip()
    if user_input.lower() in {"exit", "quit"}:
        print("Goodbye!")
        break
    messages.append({
        "role": "user",
        "content": user_input
    })
    stream = chat(
        model=model_name,
        messages=messages,
        stream=True,
    )
    assistant_text = ""

    print("Bot: ", end="", flush=True)

    for chunk in stream:
        piece = chunk.get("message", {}).get("content", "")
        if piece:
            assistant_text += piece
            print(piece, end="", flush=True)

    print("\n")

    messages.append({
        "role": "assistant",
        "content": assistant_text
    })
Let' save it as mini.py and run it with uv run mini.py. Now you've got the whole world in your hands.
Comparing the performance: local LLMs and free service
Our local LLM client is ready, Let's test different local models, qwen3.5:9b, qwen3.5-instruct:2b and qwen3.5-instruct:0.8b, and compare them with the free Google Gemini available via the web interface.
We will evaluate these models using the same prompt:
Explain "Backward Design" in higher education.
These models are running on my notebook equipped with an RTX-4060 GPU with 16GB of VRAM. I will assess their performance based on my own experience.
Why should you care about my take? Well, I was a finalist in the 2025 QS Reimagine Education Awards :]] .
| Model | Time | Mark | Remarks |
|---|---|---|---|
| qwen3.5 9b | 46.07s | 9 / 10 | Clearly captures the essence of Backward Design by starting with outcomes and aligning assessments and activities. Would be even stronger with a concrete higher education example. |
| qwen3.5-instruct 2b | 4.89s | 7.5 / 10 | Correctly explains backward design as beginning with outcomes, followed by assessments and instruction, but presents “Understanding by Design” with some inaccuracies. |
| qwen3.5-instruct 0.8b | 2.36s | 4 / 10 | The claim that it “begins with the end-user’s needs rather than traditional academic objectives” reflects a fundamental misunderstanding of backward design. |
| Gemini 3.5 Flash (free Google) | 1.20s | 9.5 / 10 | High-quality, professional explanation of backward design, clearly presenting it as outcome-first, with aligned assessments and instruction driven by learning goals. |
The qwen3.5:9b local model performs well, but hey, we can get a faster and better and free result from Google Gemini.
Comparing the price: local LLM and paid service
Next, let’s compare the cost of using a paid LLM API with running a local LLM of similar intelligence. According to Artificial Analysis, the local model Qwen3.5‑397B‑A17B is a good competitor against OpenAI's GPT-5.4 mini (xhigh) in term of intelligence.
Assume the chatbot traffic uses a typical 3:1 input-to-output token ratio (75% input tokens + 25% output tokens). As of current date, the list price for GPT-5.4 mini (xhigh) is USD 0.75 per 1M input tokens and USD 4.50 per 1M tokens. Therefore, the blended price is around USD 1.69 per 1M tokens.
Now, let’s estimate the cost of running Qwen3.5‑397B‑A17B locally.
Using our VRAM estimation formula:
VRAM ≈ Parameters in billion × precision bits / 8 × 1.2
Assume we use a standard 4-bit quantization model:
VRAM ≈ 397 × 4 / 8 × 1.2
≈ 240 GB
To run this model locally, we can use 3 × NVIDIA RTX PRO 6000 Blackwell GPUs. Each card provides 96GB of GDDR7 ECC VRAM, giving a total of 288GB VRAM. This should be enough to fit a 4-bit quantized version of the model.
A powerful workstation with 3 RTX PRO 6000 Blackwell GPUs will likely cost around USD 60,000 or more, depending on the CPU, motherboard, RAM, storage, power supply, cooling, and vendor margin. For ongoing operating cost, we reserve USD 220 per month for electricity to run the workstation.
Now we have:
| Item | GPT-5.4 mini xhigh | Local Qwen3.5‑397B‑A17B |
|---|---|---|
| Setup fee | USD 0 | USD 60,000 |
| Monthly fee | USD 0 | USD 220 / month |
| Token usage cost | USD 1.69 / 1M tokens | USD 0 / token |
And our math starts here:
| Monthly token usage | GPT monthly cost | Qwen monthly cost | Break-even time |
|---|---|---|---|
| 100M | USD 169 | USD 220 + USD 60,000 setup | Never |
| 500M | USD 845 | USD 220 + USD 60,000 setup | 96.0 months |
| 1B | USD 1,690 | USD 220 + USD 60,000 setup | 40.8 months |
| 5B | USD 8,450 | USD 220 + USD 60,000 setup | 7.3 months |
| 10B | USD 16,900 | USD 220 + USD 60,000 setup | 3.6 months |
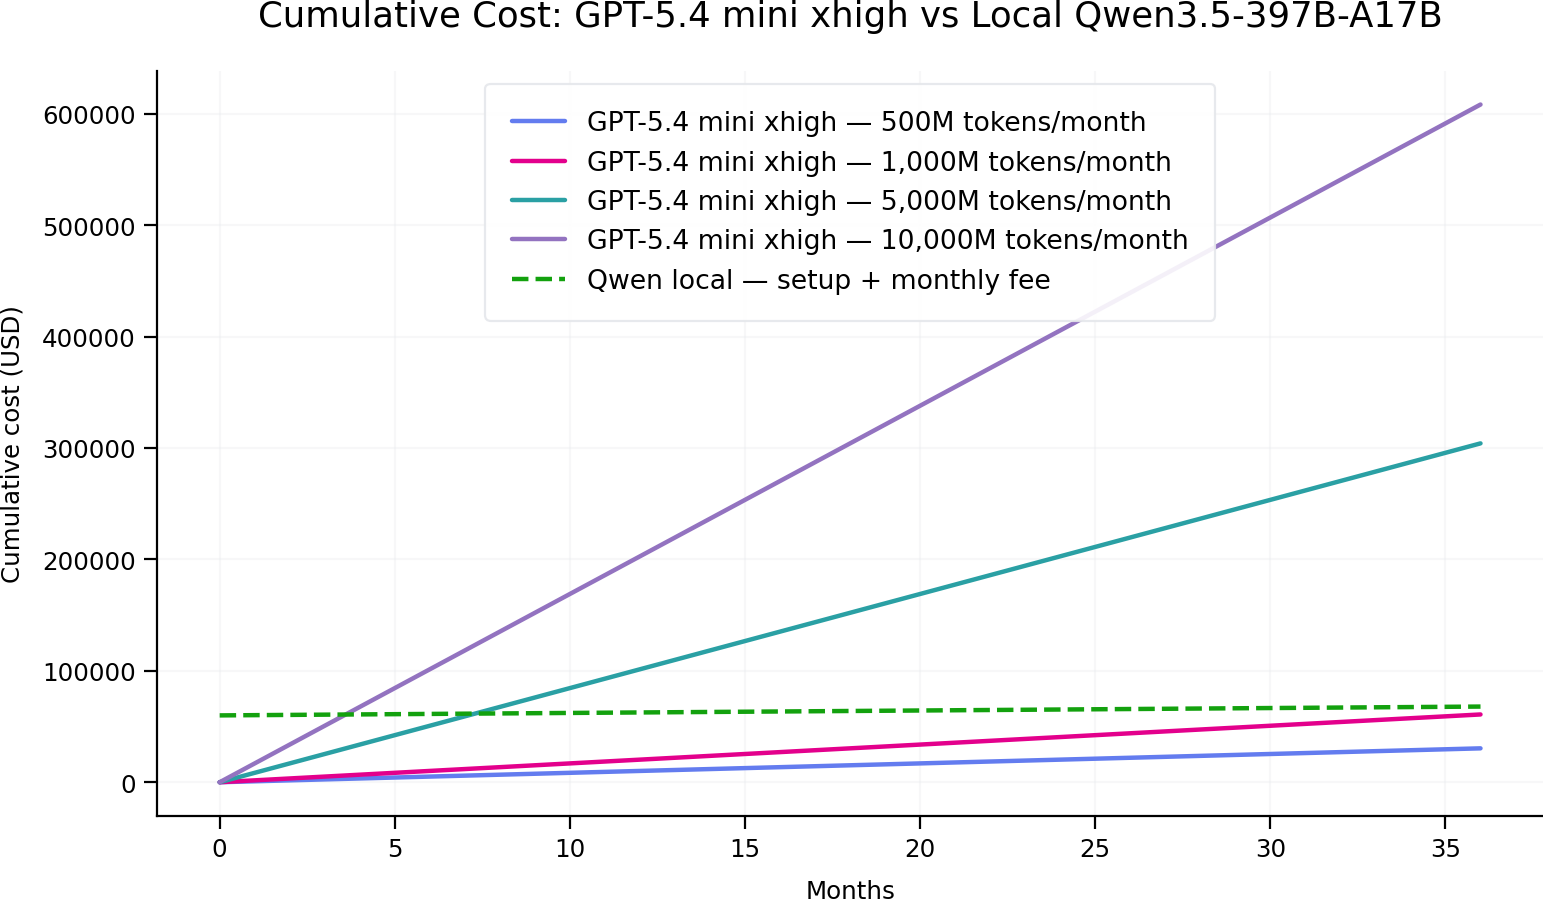
If you plan to use around 1B tokens per month, your investment in a local LLM setup will start to pay off after approximately 41 months.
Reasons to use local LLMs
After comparing performance and cost, it’s clear that local LLMs come with real trade‑offs, but also unique advantages.
On the downside:
- Lower quality than frontier cloud models: In many cases, cloud models are faster, stronger, and easier to access. Some free or low-cost cloud models can outperform smaller local models, especially in reasoning, coding, long-context tasks, and multimodal use cases.
- Hardware limitation: Memory is the wall. The bigger the model, the more hardware we need to invest.
- Maintenance: You are all by yourself to handle updates, model downloads, disk space, security, and monitoring, to make sure your setup stays healthy.
Sound like a dead end? Not quite. Local LLMs also give you superpowers that cloud APIs can’t match:
- Total privacy: Your prompts and your data stay on hardware you control, nothing is sent to a third‑party server, which is a huge win for confidential data or regulated industries.
- Zero per-token cost: Once the model is downloaded, you can experiment freely without worrying about usage spikes. In our tests, it’s hard to justify a 397B local model purely on cost, but a strong smaller model, like the 9B one we used, already feels great for prototyping and everyday tasks.
- Works completely offline: Local LLMs can work without internet access, which is useful for labs, schools, secure offices, field work, robotics or travel.
- Completely Full Control: You choose the model. You define the system prompt. You decide the guardrails. You control the data, the tools, the logs, the integrations, and the user experience. With local LLMs, the entire AI stack belongs to you.
Imagine this: you’re stuck in a remote location with no signal, yet you can still brainstorm, code, or explore wild concepts at full speed. You can even build a battle suit in a cave, with a box of scraps!

Conclusion
Building a private AI chatbot is no longer a research project. With Ollama and uv, you can go from zero to a fully working local LLM chat client in under 10 minutes. The best setup is not always the biggest model. The best setup is the one that fits your hardware, protects your data, responds fast enough, and solves your real problem.
Local LLMs will not replace every paid LLM service. Cloud models are still extremely useful when you need maximum intelligence, large context windows, high availability, and minimal maintenance. But for privacy-first workflows, experimentation, education, internal tools, offline environments, and cost-controlled assistants, local LLMs are becoming one of the most practical AI skills to learn today.
So what are you waiting for? Open your terminal, follow the above instructions, and claim your own private AI. Your data, your rules, your chatbot. Welcome to the local side.